
Brewing beer is a temperature-sensitive process. Ales require 58-68˚ F (14-20° C). Lagers need 53 down to 40˚ F (4-11° C) to properly ferment and condition. If you live in the far Northern Hemisphere, or the Southern, temperature becomes a concern. You have many options. You need not be relegated to your short summer months only.
Brewing beer in cold weather, if not simple, is not impossible. Fermenting ales have to be kept warm and cozy with wool blankets, sleeping bags or close to a heater. On the contrary, wintertime creates an optimum environment for brewing lager.
Most homebrewers start with ale brewing. It is simpler, faster, and most accessible for craft beer aficionados.
Lagers have a more subtle and nuanced flavor and making a good one is exponentially harder. As easy as an ale is to brew, bottle and quaff in 2 ½ – 3 weeks, a lager is that much more complex, with temperature staging, rests, conditioning, and a long, long rest lasting 10 – 12 weeks.
Brewing Ales in Cold Weather
Ales are the rage of modern craft brewing.
98 out of 100 American Craft Breweries, or anywhere outside of Northern or Eastern Europe will be Ale breweries.
Ales are brewed with a specific yeast, Saccharomyces Cerevisiae. This is a pure strain of yeast, and there are dozens of proprietary flavors available.
Their optimum temperature is from 58-68˚ F (14-20° C) at the upper limit.
Belgian Yeasts are an exception and I have fermented them north of 78˚ F (25° C), though I was known to push the limits of anything I put my hands on.
A boom or bust mentality, risk-taker, winner takes all.
That is just how I rolled as a brewer.
What to expect from Ale
Ale ferments vigorously and is top-fermented.
That is, it collects at the top of the beer in a high Krausen (croyzǝn), where during the primary fermentation the healthiest yeast collects and dives for the sugar.
English brewers, some of which still ferment in open vats, will scoop out the yeast with big stainless ice scoops, placing it in sanitary bins and repitching it in subsequent batches.
Fermentation, primary and secondary are done in 5-8 days and the yeast starts to flocculate (settle to the bottom) as the fermentation winds down.
The beer is fully attenuated.
Ales are often hoppy: bitter, spicy mouth feel and a flowery or bittersweet nose.
They can be sweeter or dry, and often have a light complimentary fruity bouquet due to esters.
Too cool to brew? What to do?
If, however, your ale dips in temperature, whether from the weather, faulty equipment, or improper pitching temperature, trouble ahead, trouble behind.
Here are some things to look out for and possible solutions.
Accidents happen in brewing – Full Stop.
Every brewer, especially the master home AND commercial brewers make mistakes.
How you respond and learn from them is what makes you better.
| Environmental condition | Beer Status | Adjustments |
| 1. Temp drops below 55˚ F (12° C) |
|
|
| 2. Temp returns to 60-65˚ F (15-18° C) |
|
|
| 3. Turn heat off during the day or heat with wood: Inconsistent ambient temperatures |
|
|
| 4. Impossible to keep the house above 58˚ F (14° C), even at night, or when you are actively at home |
|
|
Recommended Gear
No products found.
Making Lagers in Cold Season
A logical step to take is lager brewing in winter.
If you have a garage, a laundry room, or back room that is unheated, less insulated, or just cold in the winter, change the way you look at it. You have a 90-day lager room!
Lagers are tolerant and vary a lot in their needs and temperament.
I’ll give an example of how I brewed lagers.
Brewing to your environment
Winter is cold, yet our homes must sustain us, so regulate the beer temperature through location, heat vents, and the needs of the yeast.
Pitch your lager at about 53˚ F (11° C).
As it begins to ferment some foam will form but not like in ale brewing.
The lager yeast buds (multiplies) and works from the bottom.
The temperature will rise a little; as discussed, this is an exothermic process.
Place the fermenter in the back room, the least insulated, perhaps even in the garage.
Lagers can go through primary fermentation down into the low 40’s (4° C).
Read the yeast’s specifications carefully.
After 18-24 days the beer has gone through primary fermentation.
Rack the beer and let the beer rest for another two weeks.
Lower the temperature by ten degrees.
Crack a window, let it stay in the garage, whatever you need to do to keep it in the 40-45˚F (4-7° C) range.
After 2 more weeks, drop it as far as you can, down to 30-32˚ F (0° C). The beer may live in the garage, no blanket, with the window cracked.
Let it rest another 2 weeks, or more, depending on how patient you are.
Lager beers begin to get good after 42 days, 10-12 weeks are even better.
In this case, it is better to brew perhaps 3-4 consecutive weekends, so they are all finished at the end of the winter.
This may be the best beer ever to come out of the home brewery.
My favorite is Belgian Ale, but lager beers run a close second.
Maes Pils from Belgium, ironically is a favorite of mine. It goes down like honey water.
A special German beer is Grevensteiner Landbier.
For the Americans I recommend Bell’s Lager of the Lakes.
Attenuation Complete – Final thoughts
Do not be overly concerned about cold temps, just adjust your brewing style, and nurture the beer a little more.
Use ale yeasts that tolerate lower temperatures. There are dozens to choose from and the suppliers will guide you.
Two possible choices are Scottish ale yeast and German ale yeast (Kolsch and Alt). They are known to perform well at 55˚ F (12° C) and even as low as 50˚ F (10° C). Contact the yeast supplier directly for specifics.
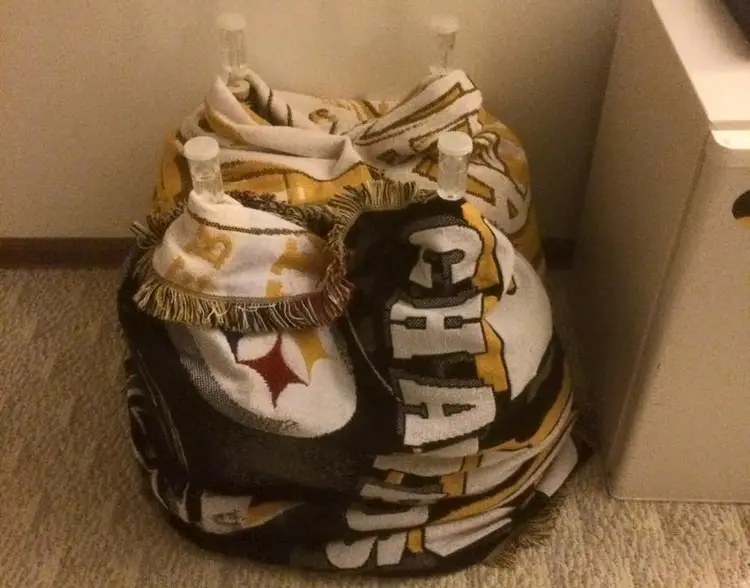
In winter or cool snaps in Spring and Fall, keep the ales cozy. A winter blanket or sleeping bag will do the trick. There are even low voltage heating strips which may suffice.
In the end, try making lager beer. It will teach you subtlety, patience, nuance, and an element of beer brewing hitherto unknown to ale brewers everywhere. Lagers are crystal clean, pure beer wherein nothing may hide, not yeast bite, husk bitterness, over hopping, over-attenuation, infection – nothing.
Lagers are by their nature balanced and sublime, cold-weather beers. They make you a better brewer.
Welcome the winter as you do the spring and fall.
New adventures await.
[email-subscribers-form id=”2″]
Last update on 2026-06-14 / Affiliate links / Images from Amazon Product Advertising API