
Your brew session is wrapping up. Whether one hour for a beginner or eight hours for an advanced all-grain brewer, the next stage is the same. You must cool your wort and quickly. Your window for effective cooling is 30 minutes, 40 minutes at the absolute outside.
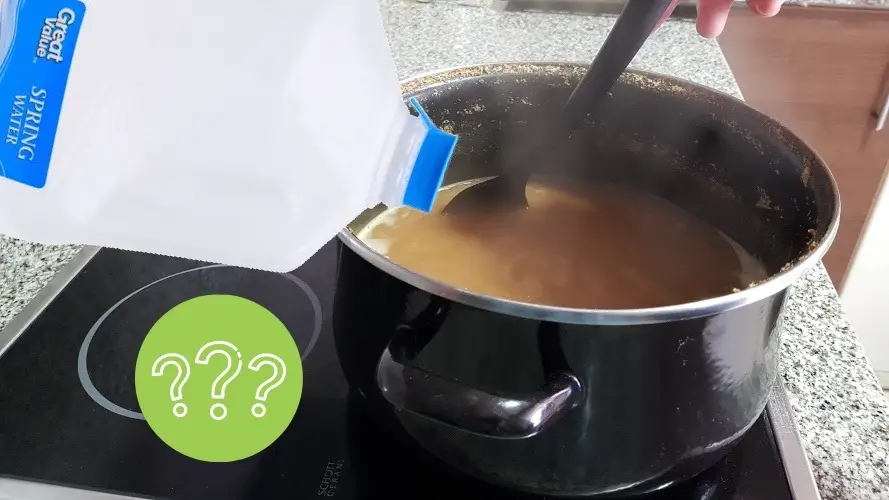
You can cool your wort by adding cold water if it is packaged spring water in gallon jugs. Refrigerating your own water adds imprecise temperature variables and makes it difficult to hit the proper pitching temperature. In the end, a combination of methods is effective.
If you are brewing concentrated wort on the stovetop, they are usually no more than one to one and a half gallons. You can add cold water.
First, make sure you understand the complete picture.
Why cool wort quickly?
The primary reason we cool wort quickly is to stop the formation of DMS – dimethyl sulfide.
This is a compound that forms from the malt itself if left to cool slowly.
It tastes like vegetables, peas, carrots, creamed corn, and is quite unpleasant.
So, whether stove-top batch or commercial brew kettle, we must get it cooled to pitching temperature within 40 minutes at the outside, preferably quicker.
Cooling the wort with cold water: not the best option
If you use pre-bottled factory sealed spring water to brew with, it is OK to refrigerate it overnight.
On brew day, you add two gallons of 40° F (4° C) water and then add your 1.5 – 2 gallons of wort, at least partially cooled, say down to 100-110° F (37-43° C).
Then top it off with more water, cool or ambient.
Be aware that rapid temperatures will cause glass (or steel!) to expand and retract quickly.
If you are brewing in glassboys, you must be very aware of this variable as the glass will lose its tensile strength and be more likely to break.
This would get you down into the 70’s (21° C).
Honestly, this is not an ideal technique.
For one, you will have difficulty correctly reading the temperature of the fermenter.
If you use one of the strip thermometers I have seen on aquariums, that may help, as opposed to getting a mercury thermometer in and out.
If you brew in plastic buckets, these temperature considerations are less of a problem. You can easily measure at any stage.
Warning, it’s better to add water in the fermenter. If you add the water in the kettle you will upset the cold break and mix up the solids, which otherwise fall to the bottom.
What happens if you miss your pitch temperature 10-15˚F in either direction?
You cool it too much to 52-55˚F (11-12° C), the yeast starts sluggishly, or you must wait for the fermenter temp to rise again.
If you go too high, 75-78˚ F (23-25° C) or higher, you must wait to pitch.
This leaves open, even if slightly for off-flavors to form or infection to sneak in.
Wort is sanitary, not sterile, as are the equipment implements you use.
There are always microorganisms present, even in ultra-microscopic amounts.
When handled properly, the yeast is the dominant species and will keep other organisms at bay.
This is why quick pitching is paramount.
Typical chilling methods – a Review
The ice bath
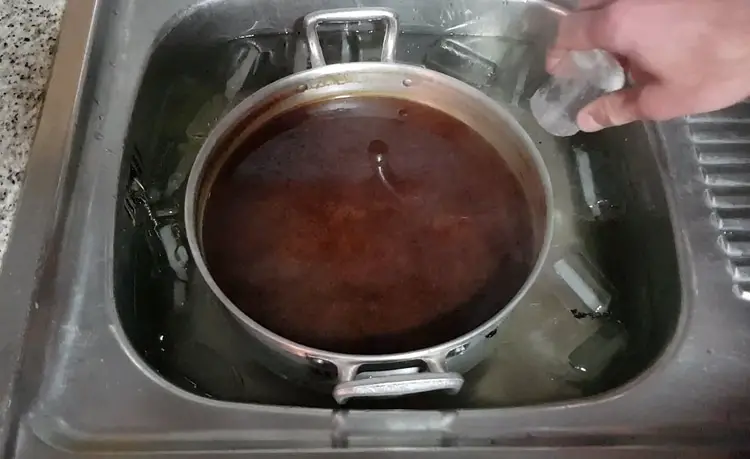
An ice bath in the sink is the most common for homebrewers.
Your pot, say a three to four-gallon stainless-steel stockpot, sits in the sink, surrounded with ice water, you have bought one to two bags of ice for brew day; an added expense.
One trick you can use is filling four to six old 16 oz. soda plastic soda bottles with water and freezing them. You will save money and their thermal integrity will last much longer than ice cubes.
You may leave the wort uncovered until it reaches 175° F (80° C), then you must cover it to inhibit airborne contamination.
Leave the lid cracked so steam can escape.
Also, feel free to stir it while it cools the first 30 degrees (20° C); it will knock the heat off more quickly.
This method will take about 30 minutes and is most common among beginning homebrewers.
You must be patient and wait for the wort to cool down to about 70° F (21° C) before you add it to your fermenter.
Depending on your well-water or bottled spring water’s ambient temperature, when mixed thoroughly you should be in the neighborhood of 65-68˚ F (18-20° C), the ideal temperature for pitching yeast.
Season: Fall, Winter or Spring brewing?
Season is important as the ambient temperature of your house will determine at what temperature the fermentation sets.
Remember, fermentation is an exothermic process and the beer will naturally heat itself two to five degrees.
This is typically why summertime is not brewing season, unless you have a utility room that traps air and is unnaturally cool using AC.
Even should you turn the AC down to say 68° F (20° C), an extraordinarily luxurious temp during hot summer weather, your beer will likely creep up above 70˚ F (21° C) and enter the danger zone.
Excess esters and phenols will form adding an overt fruity and acidic quality to the brew.
You do have one alternative for summer brewing. There is a dried yeast from Scandinavia called Kveik.
It purportedly will ferment well between 77-100° F (25-37° C)! Hard to believe. I never used it, but you have an option in warmer sub-tropical climes.
Spring and fall are ideal times for brewing as they are mild in most US climates, even if a little cool, the beer’s fermentation process serves as a natural warmer.
Do beware of winter brewing in certain circumstances.
I have lived in modestly insulated farm houses heated with wood which cooled down a lot at night, and during the day when I was at work.
I lived in NC, so while naturally warm, it would experience extreme cold snaps.
Again, the exothermic qualities of your fermentation process will keep your beer stable, and much as you would your pet on a particularly cold evening, wrap your fermenter in thick quilt or comforter.
This will insulate it from the extremes of late night and daytime cool periods in your house.
The Copper Coil
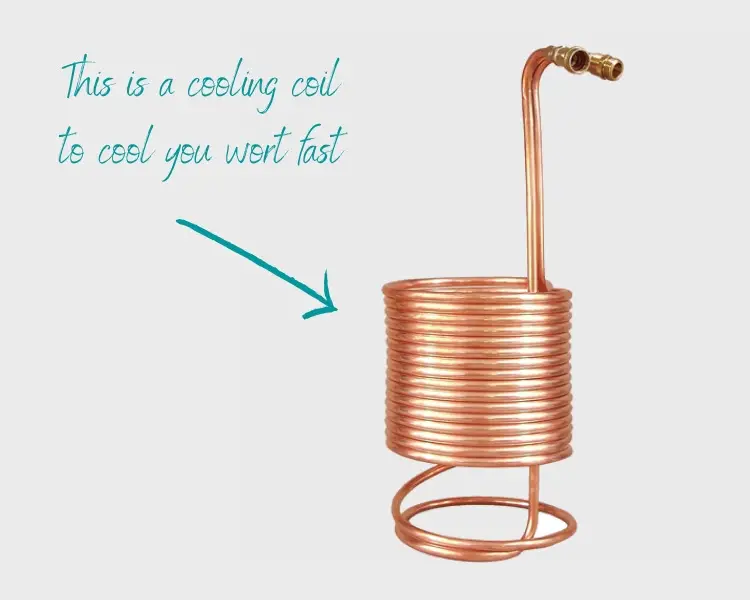
For intermediate and advanced brewers, a single or double-coil copper coil is the best and most effective way to cool.
Place the clean and sanitized coil in the hot wort for 5 minutes.
This will give one last chance to kill off any bacteria present.
I used to run cool well water through a double coil, both coils submersed into 10 gallons of wort.
For a stovetop brewer, one coil will suffice and tap water may have to suffice.
No products found.
Southern States have warmer ambient tap much of the year, so you may need to use an ice bath in conjunction with a coil.
A double coil can also be used in another way.
Immerse one coil in an ice bath, and the other in the wort. Whichever water you use will be chilled as it passes through the wort.
As mentioned above, use frozen soda bottles full of ice.
It saves money and they melt slowly.
Can I just let it sit and cool slowly?
As mentioned earlier, no, you cannot.
I had done this once or twice, mixed hot wort with cool ambient water so the beer was about 100°F (37° C).
I waited until the next morning to pitch, and the beer was OK.
I once had an electrical break-down at Green Man Brewery on brew day and could not chill my ESB for 90 minutes.
We…ahem… sold it, it was tolerable.
A week or two later, my good friend and peer, infamous Ben ‘the Beer Boy’ Pearson, came over to taste, he said, “Yeah, nice hops. I especially like the corn mouthfeel in the finish.”
And he laughed at me.
I laughed too and learned.
I was a young brewer at the time, a journeyman.
You get away with these things sometimes in brewpubs, and at home.
That said, your goal is to make real beer, as clean and purely as you can.
Do not let it cool overnight.
In Conclusion
A copper coil is best.
Ice baths are common and simple.
Adding cold water is a crapshoot.
Without very careful temperature calculation, you may miss your pitch temperature.
I recommend a combination of methods.
If numbers are your thing, and you can calculate the temperature precisely, experimentation is the heart of innovation.
[email-subscribers-form id=”2″]
Last update on 2026-07-22 / Affiliate links / Images from Amazon Product Advertising API