
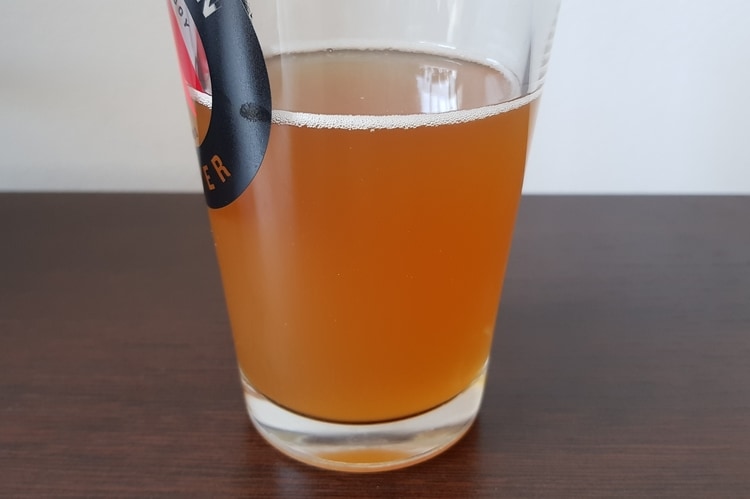
Many mistakes can be made during the homebrewing process that can turn a potentially clear beer into a hazy beer. While haze doesn’t detract from the flavor of a beer (although it can be indicative of spoilage in some cases), it isn’t usually a desired trait in many beer types, either.
Refining homebrewing practices to adjust these levels during the brewing process can ultimately result in a beer with more clarity and more pleasing color. Keep reading to find out more about what mistakes you can avoid to keep cloudiness and haze out of your next batch of beer.
Mistake #1: High Levels of Protein Can Cause Haze
If you’re trying to homebrew a very clear beer, one of the major mistakes you can make is attempting to brew with a high protein ingredient or adjuncts such as barley, wheat, or spelt.
While there are entire types of beer built around these ingredients, most brewers of wheat or barley beers accept a certain level of haziness as part of the finished product.
It is exceedingly difficult to get protein levels in these beers low enough that real clarity can be achieved.
When trying for clearer homebrew, the first step is to look towards brewing ingredients that either contribute low amounts of protein or don’t give off much protein during the mashing process.
Here are some of the low protein adjuncts you’ll want to look at:
- Corn: Corn is a popular adjunct to homebrewed lagers in particular because it helps contribute to a bright, pale golden color. Corn is better known for imparting a smooth mouthfeel to beer rather than a ton of flavor.
- Rice: Rice is used by some brewers as an adjunct not only because it helps reduce the amount of protein in the brew, but also because it imparts minimal color or flavor of its own, making it a neutral additive palate-wise.
Using corn and rice to substitute for part of the malt in a homebrew mash significantly decreases the amount of protein in the resulting brew (up to twenty percent).
Not only does it increase the resulting brilliancy of the beer, but it also makes it more shelf-stable and resistant to chill haze (which is when a beer becomes cloudy as the result of proteins and other particulates in chilled conditions).
Low protein brewing ingredients and adjuncts are an optimal choice in beer types where clarity and a light mouthfeel are more prominent traits than a strong or forward flavor (such as with hazy IPAs).
These lighter beers are a good option for those who find the hoppier or funkier flavors of darker or hazy beers too dominant.
Mistake #2: Improper Refrigeration During Brewing Can Cause Haze
Refrigeration issues can contribute to cloudiness during the homebrewing process.
Whether it’s keeping beers at temperatures that are too cold, or not leaving fresh beer in refrigeration long enough for the particulates to drop out into sediment, the temperature often plays a large part in how clear a beer ultimately ends up being.
Here are some of the issues surrounding improper refrigeration that you need to consider with regards to how clear your beer ends up:
- Keeping beer below 35 degrees Fahrenheit (2° C) can induce chill haze. Chill haze results in a beer that is cloudy at low temperatures but becomes more translucent at warmer or serving temperatures. Beers that are processed to reduce the effects of chill haze are labeled as chillproof.
- Beers that come out cloudy or hazy may require a longer refrigeration cycle to “come clear.” However, almost all beers (even the haziest of IPAs) will ultimately come clear with enough time being aged in cold storage.
- Not chilling during secondary fermentation can result in a haze. Making a point to chill beer in the fermenter at this stage of brewing can drastically improve a beer’s final level of clarity. Adding fining agents such as isinglass or gelatin during this stage can also help draw out particulates such as yeast.
Fining and filtering processes should be performed at colder than serving temperatures—otherwise, when the beer is brought up to serving temperature, it may become hazy.
Having access to plenty of stable, precise refrigeration during the aging and chilling process is crucial for ending up with clear beer at the end of your batch.
The good news is that most of the haze induced by temperature can be mitigated by enough time in cold storage.
But the bad news is that if you’re trying to create a really clear show beer or you want a batch of beer ready for a get-together or a holiday, you may not have that kind of time to spare to refine the brew.
Mistake #3: Lack of Sanitation During Brewing Can Cause Haze (and Spoilage)
One of the most underrated aspects of maintaining a clean batch of beer during the homebrewing process is sterilization of both the brewing equipment, the brewer, and the brewing environment.
Even if the batch doesn’t pick up a nasty bacteria that ends up spoiling the beer, it can pick up wild yeasts that may drastically change the flavor of the resulting batch.
If you’re aiming for a specific type of beer or a specific flavor profile, this kind of wrench in the works can be devastating.
There are two major types of haze that are induced during the homebrewing process:
- Non-biological haze (such as the haze that occurs in chilled conditions) and
- Biological haze (which results from bacteria and yeast that have been introduced to the batch).
Both non-biological and biological hazes affect the look of the beer, but the haze induced by biological factors can also lead to off-putting flavors.
Can Beer Spoil?
The answer is yes; beer can spoil.
There is a common misconception that beer is incapable of spoiling because it contains alcohol, but this is incorrect.
The good news is that even if a beer does spoil, it is unlikely to harm you.
The pH of beer is so low that no known pathogens can live in it.
This is one of the reasons that beer was such a popular drink in the Middle Ages—even in areas where the water was not safe to drink due to pathogens, beer and wine could not support disease.
The primary threat that results from beer spoiling is dull or altered flavors is that the flavor changes – bitter notes become acerbic, and acidic notes become mouth-puckering.
The spoiling that results in these flavors can also induce a cloudy or hazy appearance.
Spoiled beer is always the result of bacteria introduced during the brewing process.
This can be introduced by unsanitary brewing equipment or by adjuncts that harbor natural bacteria such as berries or stone fruit.
Two major types of bacteria contribute to beer spoilage:
- Pediococcus damnososus: These bacteria can cause a homebrewed beer to take on an off-putting, strong, and buttery flavor that drowns out and dominates any other notes that may have been present in the batch.
- Lactobacillus: These bacteria give the beer a tart, acidic flavor, and it is the bacteria that is most commonly associated with the taste of “beer gone bad.”
The kinds of microorganisms found in homebrewing aren’t necessarily a threat to people, and you are highly unlikely to get sick from ingesting them.
Still, they are a threat to the clarity and taste of your craft beer.
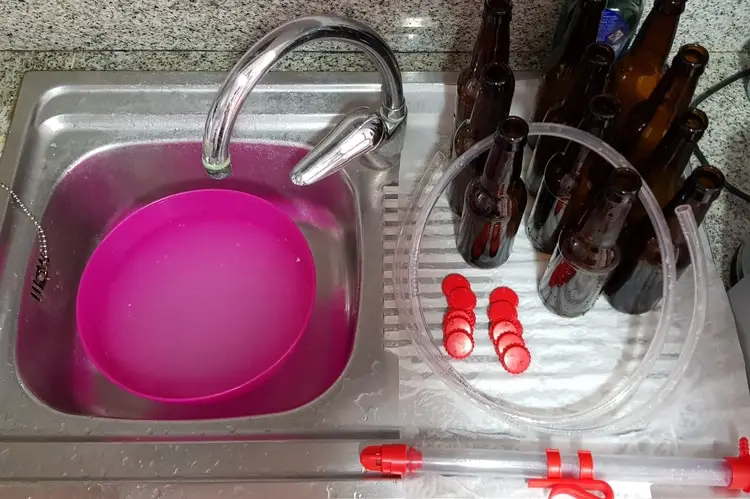
How to Sanitize During Homebrewing for Clear Beer
There are several steps you can take to sanitize your equipment, your ingredients, and yourself during the homebrewing process.
However, a significant problem that homebrewers run into is that traditional soaps and detergents are alkaline.
This can create problems where beers pick up undesirable flavors from the sanitizing agents themselves, or the alkaline residue causes a problem with head retention in the beer (leading to a very small or flat cap).
Here are some of the chemical sanitizing agents that are commonly used in brewing:
- Bleach: Bleach is often used by homebrewers as a sanitizing agent because it is commonly available in the home and only needs to be used in small amounts to eliminate unwanted bacteria effectively. Bleach should be applied to brewing equipment at a dilution of one tablespoon of bleach per gallon of water used.
- Star San: Star San is a commercial brewing sanitizer that is an acid solution, preventing alkaline residue from affecting head retention or other brewing issues. A major benefit of this sanitizer is how shelf-stable it is, meaning that a bottle of this solution should last for a long time.
- Iodophor: Iodophor is a commercial iodine solution that is mixed specifically for brewing sanitation for beer and winemakers. Iodophor can be used to sanitize and soak most brewing equipment quickly but may potentially stain plastic brewing equipment after cumulative exposure through several cleanings.
Chemical sanitation is an excellent choice for any homebrewing equipment that cannot fit into a dishwasher or can’t safely be placed inside one without being damaged.
Using a combination of chemical sanitation and heat-based sanitation is the best chance you have of eliminating most bacteria that produce haze and an off-putting or spoiled flavor.
Heat Sanitation for Homebrewers
The other option that homebrewers have for sanitizing their equipment to avoid haze is heat sanitation.
Brewing equipment can be either sanitized in an oven (dry heat sanitation) or sanitized in steam heat through a dishwasher, an autoclave, or a similar steam sanitizing device.
For many pieces of homebrewing equipment, a thorough wash through the dishwasher on sterilizing settings is enough to remove a majority of the bacteria that would cause problems while homebrewing.
Mistake #4: Lack of Fining Agents Contributes to Haze
A mistake that novice beer makers make often is that they forget to (or feel it is unnecessary to) include steps in their homebrewing process to allow for the inclusion of fining agents.
Without these fining agents or some kind of mechanical filtration, many types of artisan beer will come out naturally cloudy.
Fining agents in homebrewing are agents that remove the colloids or suspended particulates that become suspended in beer and lead to an opaque or hazy appearance.
These are some of the fining agents that are commonly used in homebrewing beer:
- Irish moss: Irish moss is a clarifier that is derived from a type of seaweed, and this clarifier has been used as an additive in brewing processes for hundreds of years to make the beer come clear. Irish moss is added during the boiling process and is available in several popular commercial forms such as Whirlfloc, Breakbright, and Supermoss.
- Isinglass: Isinglass is a substance that is derived from the dried swim bladders of fish, particularly sturgeons, and is used as a gelatin-type stabilizer in homebrewing operations to help colloids drop out of the beer as sediment. Isinglass is an effective fining agent for coagulating live yeast in the batch and forcing it to the bottom of the brew.
- Gelatin: Gelatin is an odorless, tasteless fining agent similar to isinglass except that it is derived from horse hooves rather than fish bladders. Gelatin also acts similarly to isinglass in how it helps sediment particles suspended in the beer to drop, allowing it to act as a clarifier.
- Polychar: Polychar is a fining agent that is particularly helpful with preventing chill haze proteins from remaining suspended in the batch during chilled fermentation. Even in beers that are designed to be cloudy, polychar can be used to reduce haze somewhat to give it a brighter appearance or a thinner mouthfeel.
Finings are commonly added at one of two stages in the homebrewing process:
- At the end of the boiling step or
- During secondary fermentation in the fermenter.
Adding fining agents and chilling the fermenter together can further increase the clarity of the resulting beer.
Fining agents are one of the easiest to forget ingredients to add when setting up your homebrew, and once you’ve forgotten to add it in, it’s too late.
The resulting batch may taste fine, but it won’t be nearly as clear and bright as it could have been otherwise.
Mistake #5: Improper Calcium Levels Can Lead to Haze
If a beer has the right calcium levels in it during the brewing process, it can lead to positive traits, such as:
- Lower overall pH
- A higher level of preserved mash enzymes
- A lighter color
- More florid yeast populations
- A smoother, more mellow flavor
Mash pH is an important factor in homebrewing pale lagers and other light-colored beers since a higher pH can contribute to darker colors and haze.
Proper calcium levels not only contribute to beer clarity, but they also contribute to yeast flocculation.
Without proper flocculation, yeast cannot be gathered in large enough sediment particles to drop out of suspension.
Water that is both low in calcium and high in carbonates can be challenging to brew with—in many cases, if this is the chemical state of your tap water, brewing with distilled or bottled water is a better option.
Otherwise, if calcium needs to be added to water to treat it before homebrewing, it can be added in small amounts through the use of the following:
If you plan to homebrew beer using tap water rather than distilled water, it’s a good idea to test the chemical content of your water before homebrewing so that you know what kind of baseline pH you’re dealing with as well as the presence of other issues such as carbonates.
Using distilled or bottled pH-neutral water is the easiest way to avoid setting off pH or other chemical issues that may ultimately contribute to cloudiness or haze in the beer.
Mistake #6: Improper Storage Can Lead to Haze
It is possible to store beer at ambient or warm temperatures; however, these storage conditions can contribute to a hazy or cloudy appearance.
At warmer temperatures, particulates in beer from hops, yeast, tannins, and polyphenols become suspended in the beer, making it opaque.
At lower or chilled temperatures, these particulates settle at the bottom of the keg or bottom as sediment.
Once the beer has been bottled, keeping it at higher temperatures can cause it to develop a haze.
A common mistake that many novice homebrewers make is that they make a larger batch of beer than can be practically chilled in their home refrigerator.
While it’s true that beer can be stored at room temperature without spoiling, beers that are stored at room temperature are also more likely to be stored in a place where they could potentially be exposed to UV light.
On top of becoming hazy, this can lead beers to become lightstruck or “skunked,” resulting in both an undesirable flavor and smell as the result of sulfate-based chemical reactions caused by UV exposure.
To avoid improper storage that may lead to your carefully-brewed batch of beer from becoming unpleasantly cloudy or smelly, make sure that you don’t brew more beer than you can feasibly keep in chilled cold storage.
The process of chilling beer after brewing is known as laagering, which is where the term “lager” came from.
The process of laagering is particularly crucial for the brewing of clear beers.
Mistake #7: The Brew Wasn’t Cold Crashed
Those who never have homebrewed beer before may not be familiar with the term cold crashing, but cold crashing refers to the process of drastically chilling beer after the fermentation process to promote clarity.
This decrease in temperature helps to speed up the natural process of yeast and other particles dropping out of the beer to form sediment.
The process of cold crashing works by forcing the surviving yeast floating in the brew to group together as a survival mechanism, a process where yeast clumps into larger particles or “flocs.”
As the beer is cooled down, these larger particles are unable to remain in suspension as the result of the Stokes Law of physics, which dictates the settling velocity of particles.
Making sure that beer gets cold and stays cold directly after brewing is one of the best ways to ensure the clearest beer possible when the batch is complete.
Large batches of microbrew should not be undertaken without proper refrigeration to fall back on unless you’re prepared for subpar results.
Mistake #8: Too Much Sugar Was Added to the Brew
As well as contributing to off-putting cider-like flavors, too much priming sugar added to the homebrew can also contribute to over-carbonation, which in turn has been looked into as a source of non-biological haze in beer brewing.
If beer is overcarbed, the resulting carbonation and large head will result in a beer that is so bubbly you’ll barely be able to see through it.
This is not conducive to clear homebrew.
Using too much sugar can also result in a beer with a much higher alcohol volume than you intended to brew, so brewing sugars should be used with caution to avoid accidentally creating a beverage that is closer to gasoline than beer.
When used in correct amounts, natural sugars such as honey, molasses, and brown sugar can be used to add subtle, complex caramel flavors to sweeter beers, or off-set the stronger notes in bitter ones.
The main reason that clear, light beers such as lagers tend to be dry and astringent is that the amount of sugar that is added to them is kept low to increase final clarity.
To keep light beers from becoming too dry, elements such as corn are added instead to prevent a sharp mouthfeel.
Mistake #9: Adding Fruit That Isn’t Pasteurized
Fruit and lambic beers have become increasingly popular over the past several decades, and homebrewers are no exception to the rule.
The problem is that many homebrewers try to add raw or whole fruits to their batches without taking into account surface bacteria that may be present on the fruit from growing, transport, and storage environments.
To prevent this bacteria from being introduced to the batch and potentially causing spoilage or off-putting smells and flavors, all fruits that are added to the homebrew batch should be pasteurized first.
Pasteurization can be either accomplished through the use of heat (such as creating a heated puree or mash out of whole chopped fruits) or by using frozen fruits that are either chopped or whole.
Frozen fruits are often seen as a good choice because they are gathered and flash-frozen at the peak of ripeness or in a slightly overripe state, giving them plenty of sugars and flavor to impart to the beer.
Mashing or blending of frozen fruit before adding it to the batch is usually done to increase the amount of surface area that is exposed to the beer.
Another way to ensure that pasteurized fruit is added to the homebrew is to use canned fruit purees or juices that have been commercially pasteurized, but these cooked purees often impart a different flavor than the same fruits used in a fresh context in brewing.
Why Try for a Clear Homebrew?
When it comes to clarifying homebrew, the amount of trouble to be taken in the quest for a clear brew is really up to the individual.
There are several reasons why a homebrewer might undertake refining processes to produce the clearest beer possible:
- Authenticity: Many types of historical beer recipes such as German altbiers, Kristall Weiss beers, and others have clarity as a dominant personality trait that defines them as a beer. If you’re trying to emulate the authentic recipe for one of these clear beers, clarity is critical.
- Competition: If you’re trying to brew up a batch of show beer for a homebrewing competition, clarity will be an essential showing factor if you’re showing a type of beer known for it, such as a blonde ale or a golden lager. In most types of beer, cloudiness and haze are seen as detracting traits in competition, and looks are almost as important as taste in homebrewing competitions.
- Aesthetics: Clarity and translucence are qualities that allow the other aesthetics of a beer, such as head retention and carbonation, to be even more eye-pleasing. For example, the carbonation in a clear lager is more sparkling and attractive than in a cloudy IPA.
Avoiding Mistakes for a Clear Homebrew Means Being Meticulous
Most of the methods that are used in homebrewing to clarify beer aren’t particularly tedious or expensive to incorporate into the homebrewing process, but many are easy to forget about or take for granted during the brewing process, especially for novice brewers who haven’t taken on a batch before.
Knowing the chemical processes that go into each part of the homebrewing operation can help brewers understand and avoid the mistakes that can potentially lead to a ruined batch.