Brewing beer at home for a beginner can be done using a variety of different sources. If you are interested in the easiest way to make beer from scratch you could consider using a kit with step-by-step instructions as well as active yeast and ingredients.
Many people that are interested in Brewing a large batch or focusing on taste however will add all of their own ingredients and brew the beer over a longer amount of time.
Most would recommend using a quick kit for your first homebrew experience, but in this article we will cover how you can brew beer from scratch using both methods.
If you have ever been curious about brewing your own beer, remember that it’s easier than you may think. With a bit of time and dedication as well as the right supplies, you could be enjoying your own homebrew!
The equipment you may need to brew beer at home
To get started you’ll need to buy a selection of different pieces of equipment.
Many homebrew kits come with the basic equipment that you will need to brew a home malting kit but you may have to buy bottles or containers that you can use to actually store the beer after it’s made.
Buying one of these early kits can be a great way that you can brew a small batch of beer and get a feel for the process.
Homebrewing using this method is relatively easy however and if you feel as though you’re going to be growing a lot of beer, it’s a good idea to consider investing in more than just the basic equipment.
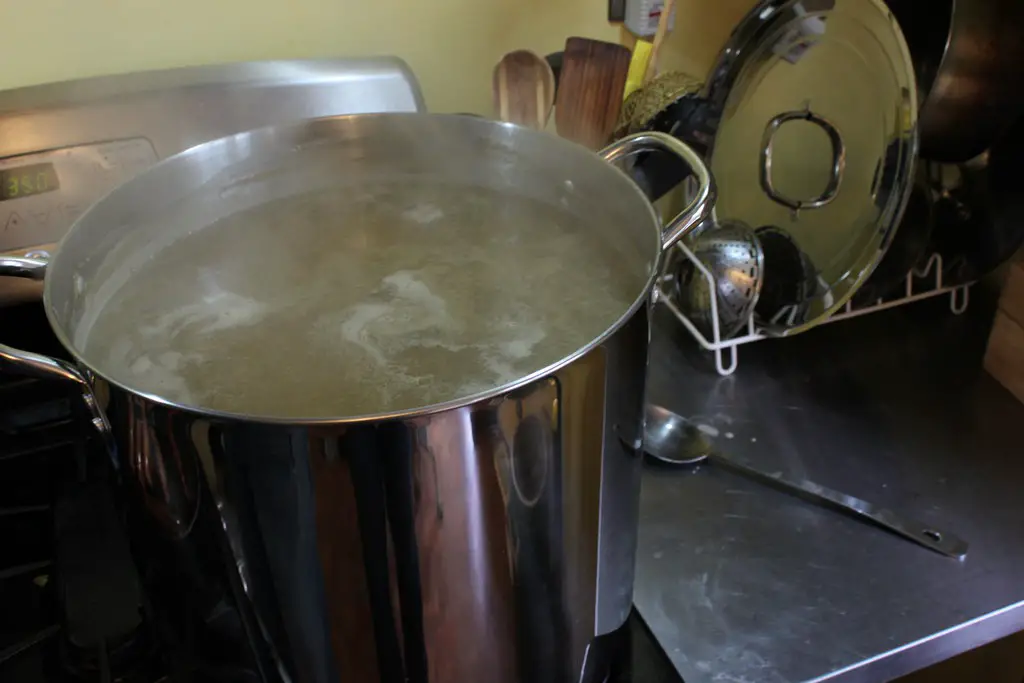
Pot, sterilizing solution, tubing and a clamp to start off with
 Most recommend getting at least a 3 gallon size pot that you can use for putting together all of your ingredients.
This file also had to be sanitized using a special sterilizing solution. For sterilizing solution you can use household bleach or specialty brewers cleaner.
Tubing and a clamp will be used to siphon the beer into areas for fermenting and into the bottles eventually. Most of the time home brewers use 3/8” foodgrade plastic tubing that’s available at many brew stores.
Bucket, airlock
") For fermentation most people recommend utilizing a 5 gallon plastic bucket that comes with a sealable lid. Sometimes professionals use glass carboys but these can generally be a little more expensive. The nice part about using a Carboy is that it doesn’t leak as much as a bucket would and it’s much better to sanitize as well.
For fermentation most people recommend utilizing a 5 gallon plastic bucket that comes with a sealable lid. Sometimes professionals use glass carboys but these can generally be a little more expensive. The nice part about using a Carboy is that it doesn’t leak as much as a bucket would and it’s much better to sanitize as well.
 With either one of these options you’ll need to have some type of airlock or stopper to make sure that carbonation and fermentation gases can escape as needed. The airlock and stopper is used to regulate the beer and make sure that the pressure inside can be released.
Without one of these specialty stopper is your beer could risk the chance that it might explode in the future.
Thermometer
 Thermometer will also be needed to measure the progress of the beer. A thermometer with a range of 0 to 100°C or from 32°F to 220°F will help you to measure the optimal temperature of your beer. If your beer gets too hot or too cold it can make fermentation difficult as well as spoil your end product.
Bottle brush, bottle capper, bottles and caps
 For bottling your beer you may want to consider using a specialty bottle brush for cleaning at each bottle, a bottle capper for putting a cap on every one of your bottles as well as a selection of bottles and caps that you can use for bottling your own beer.
You could also consider using 2 L bottles or old wine bottles with corks if you want to save yourself a lot of time.
 Bottling your homebrewing traditional bottles can be an extensive process. The main problem with using larger size bottles however is that you often end up having to drink the beer that you open as it will go flat if resealed. Work to manage which bottle types will work for you and your needs and don’t be afraid to break from the traditional if it’s going to be easier down the road.
Sanitation is the key
 One of the main aspects of any brewing process is sanitation. Without proper sanitation you will skunk any of the beer that you make.
And in proper product that hasn’t been made in a sterilized fermenter, placed in sterilized bottles or even piped into the fermenter with the help of sterilized piping can be almost inedible. It can throw the taste off, ruin the alcohol content and more.
Be sure to use the right household bleach sterilizing solution or asking your local brewers retail store.
The big battle that home brewers have to fight against is bacteria and fungus.
Many breweries use ultraviolet lights in some areas to destroy bacteria spores.
Chemical disinfecting agents like chlorine bleach and iodine are perhaps the most effective and easy to use in the home. Just be sure that you try all of your components after cleaning them and make sure that all of the chemicals have not sold their way into the fermenter or other materials that you have used.
The ingredients you will need for making the beer
 Most homebrew kits come with a specialty extract that is designed to flavor the water that you will use for your beer.
As well as the extract you can also add extra hopps to improve the bitterness of your beer or to simply go with the in package flavors that are available.
The final ingredients that are available in the package will also be priming sugar and yeast. Priming sugar or corn sugar will be used to add carbonation to the beer whereas the yeast will be added during the fermentation process to add the alcohol into the beer.
 Without a kit you will need to spend time converting a variety of raw materials into beer. This will mean buying the right barley and grains to activate so that they can be used and extracted into beer. Mashing together malted grains in hot water is a process that actually starts the process of creating the extract. Malted grains and hops are mixed together into a liquid that will eventually form beer.
When using an extract kit all of these steps are done for you and you don’t have to worry about mashing together all of the ingredients as well as getting the flavoring right. This is why so many beginner home brewers prefer to use an extract kit.
The total amount of time that usually takes for beer to be brewed ranges from a month to six weeks. This is important to consider when you’re planning out when you would like to drink your beer.
How to get started
1) Santize everything
The start of brew day involves first sanitizing everything that you’re going to be using in the process of mixing your extract or making your extract. This will mean fully sanitizing a large pot, your entire kitchen as well as sanitizing your fermentation container, plug, tubing and more.
2) Mixing the malt
Using the created malt mixture or creating your own malt involves heating up 2 gallons of water and the elements that will make up your beer. This will mean mixing in the syrupy concoction that makes up the quick malt. The malt extract will all have the consistency of a heavy syrup and you may need to use hot water to get it out of the can.
The mix will have to be continuously stirred until it starts to alter the color and you start to see some small air bubbles and foam.
Usually once the mixture starts to boil it will take around 15 min at a steady boil to start foaming.
Do not cover the pot as it can leave a huge mess on your stove if it boils over.
Once the mixture is boiled it’s time to add the Hopps. Add the number of hops that you think is necessary and boil the mixture together for at least 60 min.
The amount of time that you boil the Hopps will change the way that they are utilized in your batch of beer. A long slow boil will mean that you get to actually taste them, whereas a shorter boil will lead to a lighter less hoppy beer.

3) Cooling
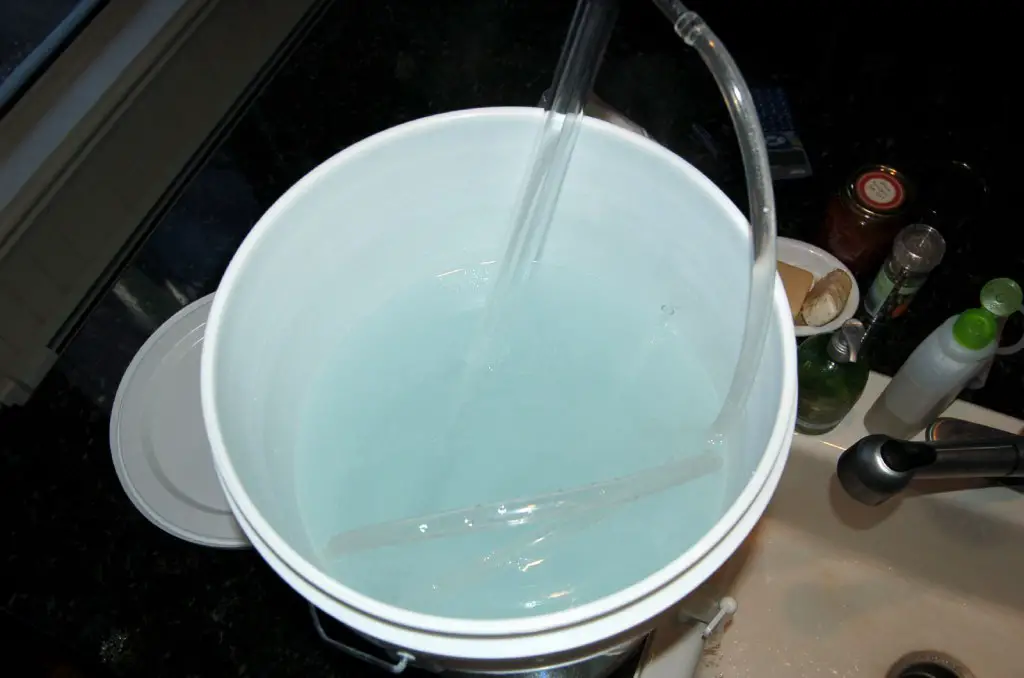
Once the boil has been finished it will have to be brought back to room temperature to reduce the chances of any type of infection.
Adding very cold water into the mixture of up to 5 gallons will help you to cool the mixture faster too. As most fermenters are around 5 gallons you will need to add liquid to your beer anyway.
4) Adding to the fermenter
Once the wort mixture has reached a room temperature of around 72° you will need to syphon the mixture into your fermenter.
Once all of the mixture has been transferred into your fermenter you can add and starts during in the yeast.
Once the yeast is fully added and mixed in, place your airlock in the top of the fermenter.
You done! At least for brew day #1.

5) Checking your beer
The fermenter airlock should start bubbling within 12 to 36 hours and continue for at least a week.
If you don’t happen to see the airlock bubbling, this could be an issue with a leak in your fermenter.
Wait at least seven full days before considering bottling beer.
6) Priming and bottling
The last stage of brewing your beer will involve mixing in priming sugar that will promote aging and fermenting after you bottle it. The priming sugar also is responsible for carbonate in your beer.
Sterilize absolutely everything that the beer will touch before bottling anything and be sure to sterilize your siphoning equipment from last time.
Syphon all of your beer into a priming bucket and add two thirds of a cup of priming sugar to the beer added into the bucket.
You can start to siphon your beer off into bottles using a bottle filler.
Be sure to secure the caps onto your bottles well as the pressure can continue during this stage and potentially cause a bottle to explode if it isn’t sealed right.

7) Aging
The next part involves aging your beer.
The big struggle is that most home brewers on their first try find it difficult to avoid waiting to drink their beer.
Beer will start to carbonate the extra yeast and proteins inserted really improve in taste over at least 3 to 4 weeks.
Store each of your bottles in a very cool and dark place and make sure that the temperatures are controls.
Try to let the beer carbonate under room temperature and then after two weeks you can place the beer in a fridge to get it ready for drinking a few weeks later.
8) Drinking and enjoying
At least 4-6 weeks after you started creating beer you can clean the glass, open up a bottle of your beer and be sure to pour it out slowly so that you don’t place any of the sediment into your glass at the bottle. Enjoy the new flavors you have created!

Use these quick steps to start your home brewing experience! And you will soon not be a beginner anymore!
Here is a video to see how Coopers beer can be made at home.
[email-subscribers-form id=”1″]