
Sparging sets the stage for the boil and is 1/3 of the critical steps needed for wort production: mashing, sparging, and the boil. It releases all of the sweet wort from the mash and with added hot water extracts every last ounce of sugary goodness.
Do it well, do it right.
Fly Sparging – Sparging- is the most efficient method – full stop. It washes the grain bed evenly allowing every particle of grain to be washed. Batch sparging is fast, convenient, and super easy. Speed is the antithesis of what a sparge philosophy should be.
Disclaimer: in addition to being an enthusiastic yet impetuous homebrewer, I was a commercial brewer for 10 years. Never once did I batch sparge nor heard an award-winning homebrewer talk about it and there is not one professional brewer out there who does it. I brewed in Asheville, NC, in the 90’s and noughts. You may have heard of us?
Table of Contents
The sparge in wort production
A perfect mash needs 1 thing only to become quality wort – a complete and efficient sparge.
The word sparge originates from Middle French, espargier: sprinkle, scatter, disperse, spatter, bespatter, disperse, intersperse.
Yes, I’m pushing this point home because nowhere in the meaning of sparge does it say dump in a huge volume of water and let it drain.
The Vorlauf – Prelude to sparge
To vorlauf is to recirculate.
After 90 minutes, upon the mash’s completion begin a recirculation process wherein you slowly drain out the sweet wort and gently lay it down back on top of the mash.
This is done slowly, and if by hand or pump, in small amounts so the grain bed never goes dry or the top of the grain bed rises above the water line.
Over time, 20 – 40 minutes, the proteins, husks, and other solids have run out of the wort and been evenly distributed on top of the grain bed.
After 20 minutes (assuming a 5-gallon batch here), check clarity with a glass and continue until virtually clear.
There is no hurry.
If you are in a hurry, have a beer, take a break, this is supposed to be relaxing.
A fine sludge will begin to appear on top of the mash; an exceptionally thick pasty layer if it is a wheat beer, as wheat is huskless.
Before you get too far along, you may need to set the grain bed.
Gently stir the top ¼ of the mash to even it out and make sure it is level, no ridges, hills, nor valleys.
If it does get a thick layer of pasty protein on top, due to an excessively thorough vorlauf (40m. or more), you have two options:
- I would often gently stir the first inch or two to allow a passage for the water.
- Another trick I have used is to make a cross, yes an X, across the top of the grain bed and that will allow the water through and in theory evenly distribute the water evenly through the porous grain bed below.
I prefer number 1 or a mixture of both.
See more about volaufing in my article, You Should Recirculate (Vorlauf) Your Mash. Here’s Why.
The Sparge in detail
Forgive an old school brewer but I’ve duly discarded the word fly.
There is a proper way to sparge homebrew and the other ways. *this excludes some technology used by commercial brewers.
Once vorlauf is complete, the wort is recirc’d and ready for proper sparging.
The mash bed should be spongy, even, and mildly settled, with perhaps 2 – 3 inches of wort on top.
I don’t want it to stay too long as it may compact the mash, but it should be fine.
Slowly start draining the wort from the lauter until the mash bed is just below the surface of the wort.
A general rule is to never let the grain hit air.
It won’t hurt it, it’s just a good benchmark to work with.
If parts of the mash rise above the water, the water may form fissures in the mash itself, paths of least resistance, therefore some grain will be excessively washed, and pockets may remain sugary.
Evenness of the wash is key here.
So it’ll be a setup like this one:
Sparge Water
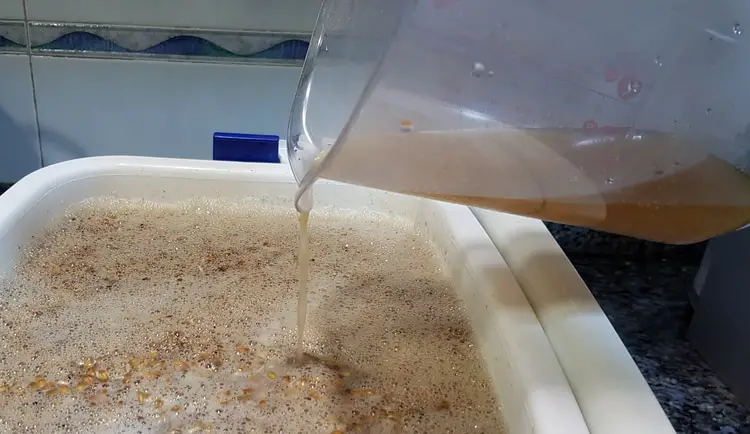
Add sparge water to thoroughly and unerringly wash the grain bed clean of all sugars, proteins and natural compounds conducive to proper wort.
The water should be the same as any of your brew water; mineralized, de-chlorinated, spring, or well-water.
Heat it to 170˚ F (76° C) exactly and maintain this temperature as you may.
I suggest using an old sports cooler (like this one) for a hot water vessel (hot liquor tank).
This maintains temperature and optimizes maltose extraction from the mash.
172˚ F (78° C) is the absolute hottest sparge water should be and 168˚ F (75° C) the rock bottom lowest.
Too high and you will leach harsh astringent compounds from the husk.
Too cool and you will get less sugar. Also, you will not deactivate the mash.
Sparging at this near scalding temp deactivates the mash.
Temps of 170˚ F (76° C) or more will completely halt all enzyme activity.
Sparge timing
A good sparge will take 60 – 75 minutes.
Yeah, I’m serious.
It is a slow process.
Gently and slowly run the wort out of your lauter.
Slowly add your water by the use of a sparge arm, sprayer or ball.
Add water at exactly the same rate as you run wort into the kettle.
At 7% boil off you will need about 5.5 gallons of water for the boil, inclusive of the cold break to yield 5 gallons.
This is about 10 ounces per minute.
Yes, literally a thrill a minute.
Still in a hurry? Have another beer. Play some music with long guitar solos or instrumentals. Be relaxed and calm for this.
Usually not necessary, you may need to take a gravity reading of your run-off over the last 15 minutes.
This would likely be the case for a lower gravity beer, say 1.046 or less.
The reason is that the sparge water under 1.010 OG will begin to leach unpleasant flavors into the wort.
Read more about this in the section, Water Additions – a Word of Warning, in the article, Is Topping off Wort With (a Lot of) Water a Good Idea?
The equipment for sparging
Mash / lauter
In a perfect world there is a mash / lauter: an insulated vessel with a false bottom.
A 40 +/-quart drink cooler, never to be used for anything but brewing makes the perfect mash-tun.
Ideally, go to your local welder’s shop and have him order a thin sheet of perforated stainless steel with 1/16” holes.
Cut it to size and fit it into the cooler about 1.5-2” from the bottom.
Install a brass ball valve on the cooler outlet.
A cheap plastic brewer’s valve is ok too, but the brass is cheap enough.
If you have this system, you can mash and sparge in the same vessel.
It is much more convenient and cleaner than transferring mash by hand to a bucket sparger: this is two food-grade pickle buckets, I call them, one set inside the other, the interior bucket has several dozens of 1/16” holes drilled in the bottom.
Something like this::
Tip: Drill your holes from inside the bucket through the bottom of the bucket. The plastic bits will go out the bottom and you can cut them with a chisel or scraper. If you drill from the bottom in, you have those plastic bits in your bucket forever.
There are other options for a false bottom.
You can build one out of CPVC pipe.
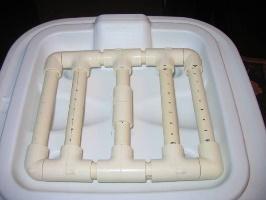
This is called a sparge manifold and may be made of CPVC or copper.
Drill a series of holes along the top and with a hacksaw, crosscut ridges in the pipe about ¼ of the way through.
CPVC is more heat resistant, up to at least 190˚ F (87° C) whereas PVC could deform at over 140˚ F (60° C).
It is not so much a bottom as just a piping contraption that allows the wort to escape.
It works fine but may be hard to clean.
At home I always used bucket lauters, never false bottoms.
So, no worries if the budget is tight.
Spray Head or Sparge Arm
There are commercial varieties available, but it is very easy to build one from copper or PVC.
This depends on your budget and how DIY you are.
As long as water is added slowly, gently, and evenly over the entire surface of the grain bed, all is well with the world.
As elaborated upon in the opening, to sparge is to sprinkle or disperse.
There are several options, DIY or commercial.
I’ll start with the easiest DIY hack I used.
As one begins ½ – ½ mashing, we are usually considering 3-4 pounds of malt.
More often than not are just sparging through a colander.
While not ideal, this is acceptable at this level.
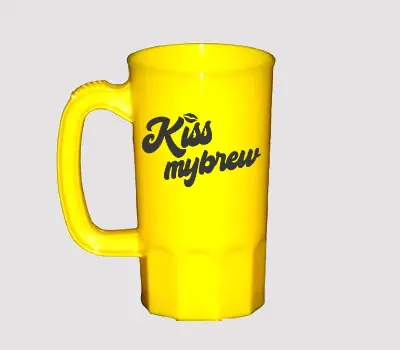
I had a simple plastic beer mug, the type you get at souvenir shops or at minor league baseball games; say 16 ounces, like so…
Drill some 1/16” or 1/32” holes in the bottom, BOOM, you got your sprinkler right there.
Dip another cup in the sparge pot, pour into your sprinkler and distribute as evenly as possible over your grain.
You can make or utilize anything resembling a type of showerhead, if you are using a round lauter.
This one seems quite efficient.
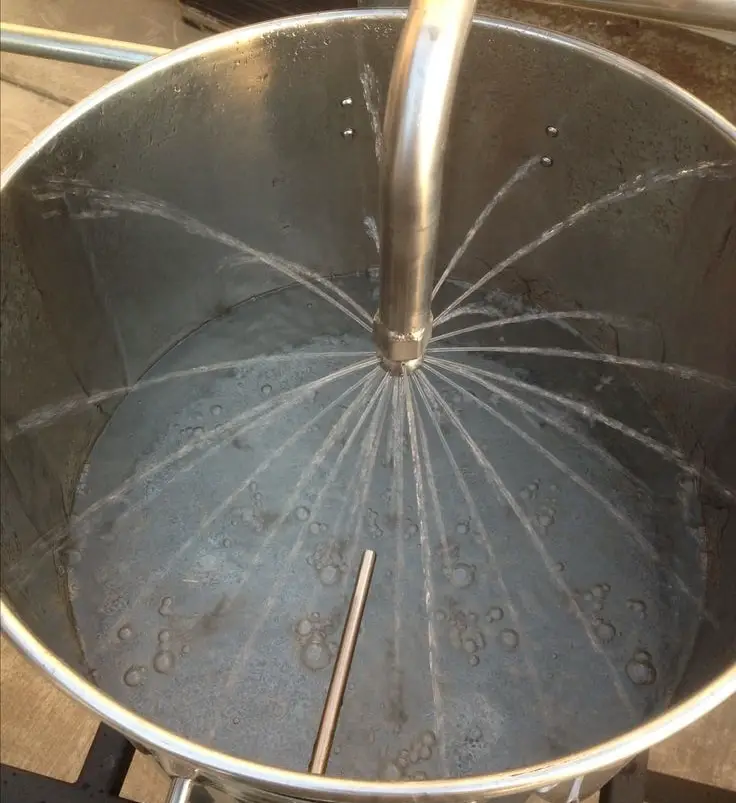
Although I would lower the pressure or enlarge the holes so the water doesn’t hit the sides of the Lauter-tun.
It shows a good dispersal which is your goal.
Should you have a long mash-lauter, like a cooler, you will need to find a way to cover all of the mash.
Seen in the example below are multiple Phil’s Spargers, piped in-line.
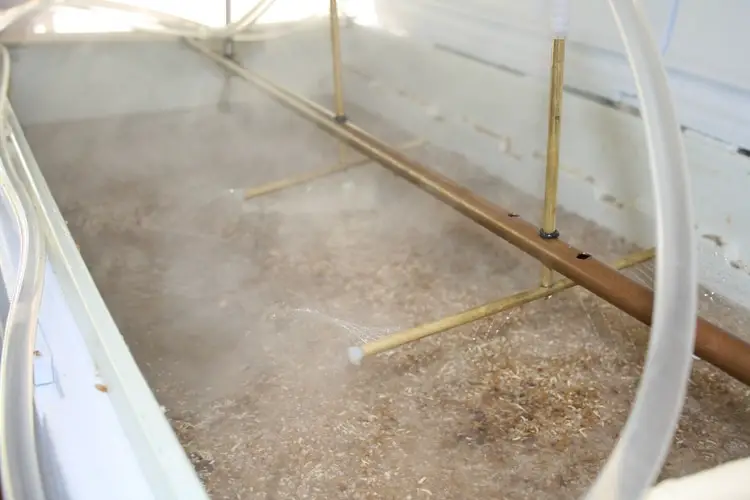
I like the sparging here.
It covers the whole surface of the grain bed.
I would however bring the water about 1” above the malt itself.
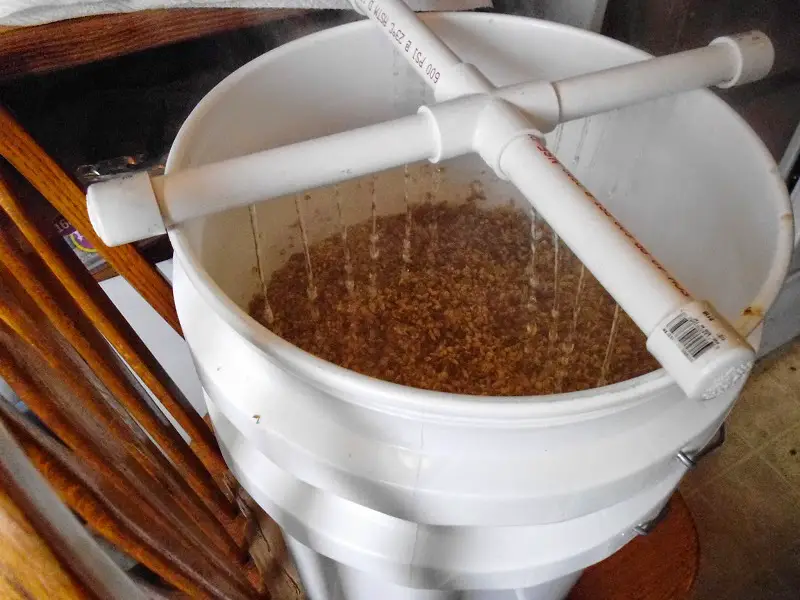
I like this sparge arm example for its simplicity.
If I built a new system, I would build a sparge arm like this one myself
Can you spot the problem with this brewer’s DIY sparge-arm process? Why or why not, would this brewer get optimum extraction?
Answer: the holes may be a little large, and the water level has fallen below the grain bed.
There are also several commercial varieties, tried and tested.
Some of us are not as handy as others nor have the time.
Either way, disperse the water evenly with a consistent temp and full sugar extraction –THE ultimate goal here- is achieved.
Examples:
The Perfect Set-Up
Over $200 USD
Should you have a large budget and little time, there are all-in-one kits available.
Mash-Lauter Tun, Hot Liquor vessel, complete with sparge arm.
The following are some examples:
Below $200 USD
If you have a modest budget, time and space on your hands here is a list of things you’ll need:
- A dedicated mashing cooler/ false bottom optional
- A lauter tun, made from two food grade buckets. Proper number of drilled holes, spigot installed in the second of the two
- A second vessel for hot water. A sports drink cooler with a controllable valve installed in best. *many have push-button dispensers.
- Several lengths of thick vinyl hose, 3/8” inside diameter.
- A sparge arm or sparge ball/ DIY or otherwise.
- Various brass, copper or plastic elbows, connectors, and nipples, for attaching hoses. Simple stainless screw-tightened pipe clamps.
Batch Sparging
Batch Sparging…I’m letting this one sink in.
Instead of adding sparge water slowly, just add all at once, stir and drain.
Simple as that.
When I first began brewing in the early 1990’s, we hadn’t an internet proper and so a wealth of information was not at our fingertips.
I remember talking to a friend back then, about ’95…
“Could you imagine if we could just type a song or artist into the computer and just get the music right away. Gaw, that’d be awesome.”
Youtube, iTunes, Spotify, you name it, wow!
And these years later, all the info one could crave is at our fingertips.
Resources are seconds away.
Brewing input and know-how flows from around the globe. And to think, when I had a problem, I had the phone number of my friend Sam who introduced me to beer, and I had Charlie Papazian volume 2.
The brewing schools of hard-knocks, wastoids, and educated guessing; I attended all three.
Explaining Batch Sparging in detail
- Mash in a cooler for 60 – 90 minutes at 148 – 158˚ F (64 – 70 ° C).
- Completely drain out the wort 1-3 times and dump it back into the cooler for volaufing.
- Drain out all the wort and into the brew kettle.
- Heat mash-water (1 quart per pound) to 170 ˚ F (76° C).
- Dump all of it into the mash and stir well.
- Drain out all liquid and pour into the brew kettle.
The whole process, excluding hot liquor heating, 10-15 minutes, tops.
Here’s an example.
That was easy!
Well… you may as well buy your brewing literature AND get your advice from Office Depot.
They will reveal as much or more about sparging than the benefits of batch sparging could possibly net you.
There are two possible reasons anyone would do this:
- You are so busy, you literally have no time for anything, and the 90 minutes you save from batch sparging will free you up for work and other life-or-death activities.
- Your grain supplier has convinced you that this is the best method and he secretly laughs every time you leave the store.
Forgive my cynicism, as I’ve thus far kept a steady, positive and encouraging focus here at Kissmybrew.
I draw the line HERE!
This is not simply a poor, most inefficient way to sparge; it is an illogical approach and defies brewing fundamentals.
I am sad, no offended to say that such a thing exists and is encouraged in any way whatsoever.
Your sugar extraction rate is 60%, at best!
Go back to paragraph one and read the meaning of sparge.
Batch sparging would be the opposite.
I would call it batch disparaging or sugar sloughing.
One man’s humble opinion – who built 2 breweries by hand, formulated and produced 25 plus professional recipes in my career.
In the end you do what feels right to you.
Conclusion
I’ve shared about all you need to get the most out your mash, extracting every last drop or sugary malt.
You stopped the flow at just the right time, kettle topped off, harsh tannins left behind and a clear wort ready for a lush and chunky hot break.
Aside from fermentation and conditioning, sparging on brew day requires the most patience and exactitude.
Vorlauf until clear, drain slowly, and add water at the proper temp and rate.
You are following in the footsteps of Master Brewers.
[email-subscribers-form id=”2″]